Welcome
IMPORANTMarch 29, 2020
Apple has a requirement that all apps must support all screen sizes and use other aspects of iOS 13 by June 30, 2020. The Gun Log apps are very complex with hundreds of UI elements developed originally for iOS 4. I do not believe I will be able to meet there deadlines. With the current economic conditions of Spring 2020 I can not afford to work a lot on these apps that combined made about $80 a month in 2019. I am putting my efforts into keeping my day job. I will work on Gun Log SPC, which means that Gun Log and Ballistics GL will be discontinued. Those with Gun Log should switch to Gun Log SPC. Just copy the database from Gun Log to Gun Log SPC, it is the exact same format. Gun Log SPC is just like Gun Log and does not use Apple's CoreData to save the database on Apple's Cloud Storage. Gun Log SPC does print and email which are two features Gun Log does not have. I will make the Apps free so that everyone has a chance to get what they need and have the best path to a new version someday.
Thank you for purchasing one of the most highly rated and feature rich firearms apps for iOS. I want you to know that the Gun Log family of apps are designed for those that use their firearms. The original concept of the app was a range log, a replacement for pen and paper. The app has grown beyond just a range log to include logs for firearms, ammunition, accessories, maintenance, and failures. Also the app has an external ballistics calculator to assist the sighting in process or estimating bullet drop.
I will update this support blog with news on upcoming releases and if there are any issues.
Please "Like" Gun Log on Facebook.
https://www.facebook.com/pages/Gun-Log-App/187082678018864?ref=hl
If you are looking for a comparison of Gun Log and Gun Log SPC:
Gun Log -vs- Gun Log SPC
I promised that Gun Log would never use any technology for exporting the data. That includes iCloud support, email, and printing. In the early development of the app many users expressed concern that their data could get hijacked, sniffed, and stolen. So I promised not to add those features. I soon found that promise to be very restrictive, but instead of breaking the promise, I made a new app called Gun Log SPC. If you want more features then consider Gun Log SPC. Requests made in reviews will not change this promise.
In the "Info" view there is an link to an email address. If you tap and hold on it you will be presented with the option to send an email. This is different than having email code in the app. Text that is recognized to be in the format of a web address / URL or in the format of an email address is used by iOS to launch Safari or compose a mail message. The mail message is launched as a link and the email does not have any access to any of the data in Gun Log.
Latest News
May 11, 2019
Version 12.0.1 is now available. This version is to bring the app into compliance with the latest iOS requirements.
May 30, 2017
Version 10.0.2 is now available. It is important to know that the App now runs in the background which means you must EXIT THE APP BEFORE DOING A BACKUP OR A RESTORE by double clicking the home button on your device and then find the app and swipe upwards to exit the app.
Feb. 27, 2016
Here are some independent reviews of the app:
American Warrior Number 5
Firearms Network Radio
AR15 Podcast ARP 101 November 27, 2015
Knives, Guns, & Gear
Gun Carrier
Getting Started
Password
In the iOS Settings app you will see an entry for Gun Log.To enabled the passcode just tap the app entry and turn on the passcode. Remember your password. There is no way around the password. When you launch Gun Log it will prompt you for the new passcode. Remember, DON'T FORGET YOUR PASSWORD or you are.... in a mess.

Backup Instructions
Backups just got easier with Mac OS Catalina. Read about it here. Just connect your device, open a Finder Window, under Locations on the left select your device, then select "Files", find Gun Log SPC and drag "Shooting_Buddy.sqlite" to your Mac. To put the file on another device just reverse those steps.Itunes Instructions
Gun Log has support for iTunes file sharing. This feature allows you to save the data to your computer via iTunes. It is not automatic. You have to do it. Through iTunes you can save the Gun Log's database for personal backups. The Gun Log database is called Shooting_Buddy and you will see it in iTunes
In iTunes select your device and then select the "Apps" details for that device in the center panel. You will see a section near the bottom for "File Sharing". Select Gun Log and you will see a file called Shooting_Buddy.sqlite. That is the database. Drag the file to the desktop of your computer. You have a backup now of all of your data.
I back up my primary device after every range session or ammo inventory session. That way I can replace it if I delete Gun Log or some iTunes sync or upgrade fails.
Warning
Do not take a backup from Gun Log +P and try to install it into Gun Log unless you are running Gun Log v5.9 or higher. The iCloud information in the database will not allow this to work as of iOS 6. If you are running Gun Log v5.9 you can take the database from Gun Log +P, just make sure if the +P database is named "Shooting_Buddy_iCloud.sqlite" and you rename it to "Shooting_Buddy.sqlite" on Gun Log.These steps are similar for all of the Gun Log Apps.
Before you start the backup or restore, you must exit the app by double clicking the home button on your device and swiping the app upwards so that the app is actually stopped and not running in the background. This makes sure the database file is closed.


You need a computer that can run iTunes and a USB cable to connect your iOS device to the computer.
 |
| Connect your iOS device to your computer. |
 |
| Select your device (iPhone or iPad) |
Step Two: Select the "Devices" icon at the top left of iTunes so that iTunes shows your connected iOS device.
 |
| Select "File Sharing" |
Step Three: Select "File Sharing"
 |
| Select "Gun Log" |
Step Four: Select "Gun Log" listed in the "File Sharing" panel.

Step Five: Select "Shooting_Buddy.sqlite" which is the database file for Gun Log. Drag this file to your computer and save it in a folder. You may want to name the folder something like: "Gun Log Backup December 2018" so that you can keep track of your backups.
To restore the backup file just follow steps one through three and then basically reverse step five by dragging the database file from your computer onto iTunes and drop the file in the "Gun Log Documents" panel.
To transfer the backup file to another device disconnect any other devices and connect the device on which you want to transfer the database file. Now just follow steps one through five and then basically reverse step six by dragging the database file from your computer onto iTunes and drop the file in the "Gun Log Documents" panel.
The "method" behind the App
Let me explain how to "think about" the app.Firearms
Firearms have:- Details such as make, model, caliber, a photo, serial number, purchase info, sale info, and more.
- Configurations which specify sight height, barrel length, twist rate, a photo, a list of accessories, and more.
- Maintenance records which specify details of the type of maintenance performed and when.
- Drop tables where external ballistics are calculated for a weapon, a configuration, and an ammunition.
Ammo
Ammo has make, name, caliber, type, purpose, round count, ballistic coefficient, muzzle velocity, and much more.Ammo is used in firing sets and several reports.
There has been some confusion around how to use the round count and keep up with how many rounds fired. In the ammo view you enter how many rounds you obtained (purchased, hand loaded, etc.) As you use ammo in a firing set the firing set records the rounds fired. The number doesn't decrease in the ammo view. The usage is shown in the ammo reports such as "Rounds Fired by Ammunition" and "Rounds Count by Caliber".
When I purchase more bulk range ammo I just open my entry for that ammo and increase the round count because I don't really want to track each lot by creating a new entry.
When I purchase hunting ammo I enter a new ammo entry because I do want to track the use and performance of that ammo.
Firing Session
A firing session is a day at the range or a day in the field. During a firing session you may set up various targets and use different firearms. Therefore a firing session can have many firing sets recorded.Firing Set
The firing set is the "heart" of the app. This is where you bring your firearm, a specific firearm configuration, and ammo together.A firing set has:
- Firearm
- Firearm configuration
- Ammo
- Fields such as set type, firing grip, distance to target, rounds fired, group size, weather and lighting conditions, and much more.
- Photo of your target or results.
- Failure entry where you can capture any type of failure you experience. This is automatically associated with the firearm, firearm configuration, and the ammo. This allows you to track problems and analyze issues.
Accessories
An accessory entry has details such as description, type, serial number, count, and other information. An accessory can be associated to many firearm configurations. You have to enter the accessory first and then go to your firearm and open the configuration that uses the accessory and add the accessory.Reports
The reports area is where data is grouped, sorted, and organized. Suppose you want to find the entry where you had a failure to eject for a pistol. Instead of trying to remember which firing session has the firing set that has the failure just open the reports and tap "Failures by Firearm" or "Failures by Ammunition".User Interface
Note: With the release of Gun Log 7.0.1 there will be some changes to the UI. There is a report icon on many of the views. While I hope to eventually update all of the images in this tutorial, for now I will briefly introduce the addition of text reports.Here is a screen shot of Gun Log running in iOS 7. Notice the "report" button on the right side of the button bar, just right of "All Owned Sold". This report button will bring up a text report of the current view. Sometimes there will be an option for various types of reports, such as "Standard" or "Expense".

Notice the Report button here at the right of the button bar for the Ammo view. Most every view has a report button now. Remember, Gun Log doesn't print or email, however the data in the reports is informative and very useful and you can copy the text and paste it if you want.

Here is what Gun Log 7.0.1 looks like in iOS 6.1. Notice the Report button on the right, just below the "+" button.

This shows the Ammo view has the Report button as well as most of the views in Gun Log 7.0.1.

Here is a Firearm's detailed view on a 4" Retina display. Notice the Report button on the right, just below the Cancel button. Because of the needed room to fit the button in icons are used for all of the buttons now. The pistol with the suppressor represents "Configurations". The oil can represents maintenance. The reticle represents ballistic drop calculations. Of course the camera represents the photo section.
 |
| iOS 7 |
 |
| iOS 6 |
There are five top level views in Gun Log.
- Firearms
- Ammo
- Sessions
- Accessories
- Reports
Note that the following screen shots may differ in color than your version of Gun Log. Since Gun Log and Gun Log SPC have the same layout and there are many screen shots for both support sites, I reuse images whenever the layout is the same.
Firearms
 |
| iOS6 |
 |
| iOS 7 |
Ammo
 | |
| iOS 6 |
 |
| iOS 7 |
Sessions
 |
| iOS 6 |
 |
| iOS 7 |
Accessories
 |
| iOS 6 |
 |
| iOS 7 |
Reports
 |
| iOS 6 |
 |
| iOS 6 |
 |
| iOS 6 |
 |
| iOS 7 |
 |
| iOS 7 |
 |
| iOS 7 |
PDF Reports
PDF Reports can be generated for firearms or firing sets.
To generate a firearm PDF report select a firearm and tap the report button at the top right.

Tap "PDF Report".

To generate a firing set PDF report open a firing set and tap the report button at the top right.

Tap "PDF Report"

You can find your saved PDF Reports by going to the Report tab of the app by tapping the Report button at the bottom right and then scroll down until you find "Saved PDF Reports"


User Interface Elements
The app has many features. Instead of explaining every button and view in great detail I will explain the common elements.
The image below shows the UI elements of the main Firearms view.
Tap the "+" button on the right to create new entries. The "+" button is used through out the app to create new entries.
Tap the "Edit" button on the left to remove entries.
Next to the title "Firearms" is the info button. This button brings up important information on how to backup your data and find this tutorial.
Below the title of the view and at the top of the list of firearms is a button bar.
The icon on the right, just below the "+", is the report button. This button is used throughout the app to generate a report based on the contents of the current view.
The buttons that are grouped together control how the list is displayed. These buttons may control sorting or filter out items. For the firearms view the Make | Caliber controls grouping of items. The All | Owned | Sold filters the items to show all of your firearms or just the ones you still own or those you have sold.
 | |
| iOS 6 |
 | |
| iOS 7 |
Notice the Ammo view uses the same layout pattern as the Firearms view. Some views, like Ammo, have the ability to duplicate entries as a convenience. Tap the "Edit" button on any list and if a blue "+" button appears on the right of an entry you can tap that and it will create a new entry and duplicate the major field values for that entry.
Your ammo list can become very long. You can filter and only show ammo on hand, that is ammo that has not been all used in a firing set.
Notice the similar pattern of layout and use of UI elements for all of the similar views in the app.
 |
| iOS 6 |
 |
| iOS 7 |
If you navigate into a firearm's details you will see these controls (image below) at the top of the view.
On the left is the standard iOS button to navigate back from whence you came. On the right is a Cancel button. If you hit the Cancel button it does not delete the entry, it just doesn't save any changes since you entered the screen. Anytime you navigate to another window the app automatically saves data, so cancel can seem confusing at times. For instance if you entered some data in a firearm and then tapped the button to add a photo the firearm would automatically save and when you come back from the photo if you hit cancel it would seem that nothing was canceled.
The buttons from left to right:
The pistol with a silencer represents a "Firearm Configuration". This is where you can create multiple configurations. A configuration is where you attach accessories to a firearm, describe multiple caliber setups, etc.
The oil can icon represents the maintenance logs.
The reticle icon is where you can create ballistic drop tables for the firearm for quick access.
The camera icon is where you associate a photo.
The report icon (as through out the application) will generate a report for the firearm.
 | |
| iOS 6 |
 |
| iOS 7 |
Pickers are views where you select "something". Below is the top of one of the Ammo Pickers. If you have already picked a weapon that has the caliber specified and you bring up the ammo picker it will filter the ammo based on the weapon's caliber. If you do not see any ammo in your list just turn off the Caliber filter. The On Hand | All filters if the ammo by availability (rounds you still have on hand).
 |
| iOS 6 |
 | |
| iOS 7 |
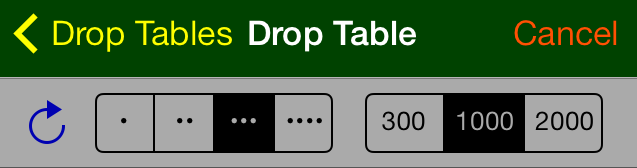
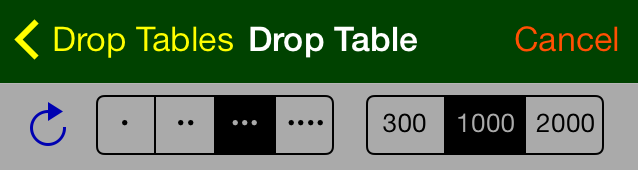
Below is the header for a ballistics drop table.
The icon on the left is used to generate the data.
The segmented control with . | .. | ... | .... controls how much detail are shown in the results. More dots means more detail.
The control with 300 | 1000 | 2000 limits how far to calculate. Values are in yards.
 |
| iOS 6 |
 | |
| iOS 7 |
There
isn't much the app doesn't already do. Most of the feature requests I
receive are for functionality that already exist in the app. For
instance, one user asked if I could change the app to associate
accessories to firearms. It already does that. Accessories are attached
to a Firearm Configuration. If you think about it, that is what a
configuration is, a firearm and its accessories.
Firearm View
Adding
a new firearm takes you to the firearm view or sometimes called a
detail view because the details are shown and entered there.
Fields,
UI elements where you enter data, are edited by tapping in the field
and the appropriate key board will appear. Some fields have buttons next
to them. Those buttons will bring up a picker so that you can select a
value instead of typing. This pattern of button next to field to bring
up a picker is used through out the app. Further below there is a screen
shot of the "Make" picker.
| iOS 7 |
 |
| iOS 6 |
Tapping the configuration button (the pistol with a silencer) brings up the configurations list. A default entry is created when a firearm is created. You can use it or delete it.
 | |
| iOS 7 |
 |
| iOS 6 |
Tapping the entry takes you to the configuration details view. A configuration can have a photo or a list of accessories associated. To add an accessory just tap the Accessories button and then add accessories to the list that is shown. You should enter your accessories first.
| iOS 7 |
 |
| iOS 6 |
Tapping the photo button brings up a view where you can take a picture or select a picture from your camera roll.
 |
| iOS 7 |
| iOS 6 |
iOS 6 requires you to give permission to an app that wants to access your photos.
After you have selected a photo it will display as shown below. Note that the trash button removes the photo from the app and not from your camera roll / photos. The app stores a reduced quality image therefore I recommend keeping your high quality photos in your camera roll.
 | |
| iOS 7 |
 |
| iOS 6 |
The Make Picker
As mentioned above in the weapon detail view if you tap a button next to a field it will bring up a picker. Below is the Maker picker.Notice the buttons at the top. The All | Default | Custom filter the values of the picker.
 |
| iOS 7 |
 |
| iOS 6 |
Selecting Custom shows there are no custom or user defined entries. Just tap the icon on the right, it is the compose button.
 |
| iOS 7 |
 | |
| iOS 6 |
Tap in the field next to the blue "+" button.
 |
| iOS 7 |
 |
| iOS 6 |
Type in a custom value.
 |
| iOS 7 |
 |
| iOS 6 |
Tap the blue "+" button to commit the value to the list.
 |
| iOS 7 |
 |
| iOS 6 |
Tap the done button at the bottom right.
 |
| iOS 7 |
 |
| iOS 6 |
Now you have a custom entry. These steps work for all of the pickers that allow custom values. Tap the new entry to select it and tap done.
 |
| iOS 7 |
 |
| iOS 6 |
Now you have entered a make for the firearm. You could have just typed the value in the field, but if you have more than one of that make using a custom value in the picker will save time.
 |
| iOS 7 |
 |
| iOS 6 |
Ammo
An Ammo entry is an entry or log of an acquisition of ammunition. If you purchase 25 rounds of ammunition for $18.00 you will log a round count of 25 and a price of 18. You do not edit the round count if you use the ammo in a firing set. The reports of the app will take every firing set's value for rounds fired and subtract that value from the ammo's round count to give a report of rounds remaining.I use the ammo entries in two manners.
- Bulk entry. I do not enter a new ammo when I buy more range ammo of the same type. I just edit the existing entry and increment the values that I want to track which is the round count. For example, if I buy 50 rounds of UMC 9mm FMJ and later I buy two more boxes for an additional 100 rounds I go to the ammo entry and change 50 rounds to be 150 rounds. I do not want hundreds of entries of ammo for range or plinking ammo.
- Lot entry. For hand loads, match ammo, hunting ammo, and other ammo where I am seriously tracking performance and accuracy I enter the ammo by lot. Sometimes a lot is just a box of ammo and other times it is several boxes with the same lot number or several hand loaded rounds.
To create a new entry, just tap the "+" button. This same method is used through out the app.
|
| iOS 7 |
|
| iOS 6 |
Tap the make button...
 |
| iOS 7 |
 |
| iOS 6 |
... pick a value...
 |
| iOS 7 |
 |
| iOS 6 |
... and you have entered the make for your ammo.
 |
| iOS 7 |
 |
| iOS 6 |
The name field doesn't have a picker, so you can type a value if you want. There are no fields in the entire app that require you to enter data. You can enter as little or as much as you want.
 |
| iOS 7 |

Firing Sessions
Firing sessions are where you keep your firing sets. A session is like a day at the range and a set maybe three rounds at a target or whatever you deem to be a set.
Same method as everywhere else in the app, just tap the "+" button.
 |
| iOS 7 |
 |
| iOS 6 |
A session is typically at one location. Enter in the data that makes sense for your session.
Tap "Go to Firing Sets".
| iOS 7 |
| iOS 6 |
Firing Sets
Tap the "+" button to create a set. A firing session can have multiple sets.
| iOS 7 |
| iOS 6 |
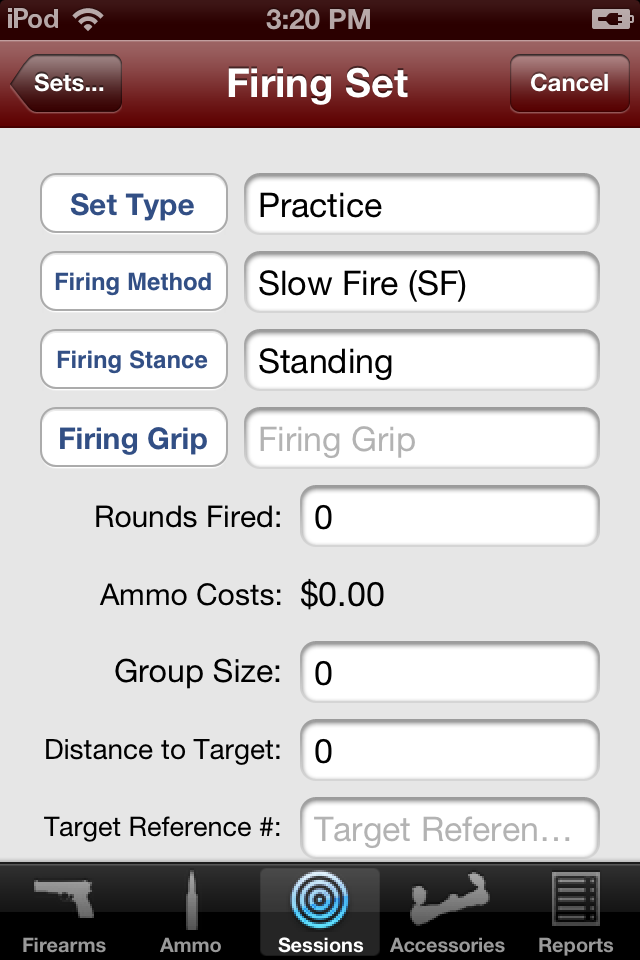
In the firing set you can save a photo of the target, record failures, or bring up a drop table. The firing set is where a firearm and a particular firearm configuration is used with a particular ammo. By entering in as much data as possible reports can be generated to show how many failures a firearm has experienced, or how many failures with a particular ammo. A report can show how many rounds of ammo you have on hand or the smallest group size for a specified distance.
| iOS 7 |
 |
| iOS 6 |
Here you have to use pickers to enter the firearm, configuration, and ammo.
Here is the weapon picker.
 |
| iOS 7 |
 |
| iOS 6 |
Here is the configuration picker.
 |
| iOS 7 |
 |
| iOS 6 |
Here is the ammo picker. Notice that nothing shows up. This is because we didn't enter a round count in the ammo, so just tap "All".
 |
| iOS 7 |
 |
| iOS 6 |
Once you tap all the ammo entries appear.
 |
| iOS 7 |
 |
| iOS 6 |
So this is what a firing set looks like after picking a few values.
 |
| iOS 7 |
 |
| iOS 6 |
Scroll down to Addendum Two to see more details about Firing Sessions and Firing Sets.
Accessories
Just tap the "+" button to enter an accessory. You have to enter an accessory here if you want to pick an accessory in the firearm configuration.
 |
| iOS 7 |
 |
| iOS 6 |
You can add a photo if you want or create a text report.
 |
| iOS 7 |
 |
| iOS 6 |
You can associate an accessory to a firearm configuration. Just go to the firearm and then go to the configurations lists and choose a configuration. To add an accessory just tap the Accessories button and then add accessories to the list that is shown. You should enter your accessories first.
Reports
 |
| iOS 7 |
 |
| iOS 6 |
Rounds Count By Caliber Report
A very useful report is the Rounds Count by Caliber report. This report allows you to see how much ammo you have on hand.When the "All" filter is selected you see all of your ammo.
 |
| iOS 7 |
 |
| iOS 6 |
 |
| iOS 7 |
 | |
| iOS 6 |
If you select "≤ 50" it will show you the ammo where you have 50 or fewer rounds still on hand. If you select "≤10" it will show you the ammo where you have 10 or fewer rounds still on hand.
 |
| iOS 7 |
 |
| iOS 6 |
If you select "0" it will show you the ammo where there are none on hand, you are out of, it's all gone!
 |
| iOS 7 |
 |
| iOS 6 |
Drop Tables
I have already entered data for "Drop Table for User Specified Values". You can add your own entries by just tapping the "+" button. Select the entry...
 |
| iOS 7 |
 |
| iOS 6 |
... and you see the details.
 |
| iOS 7 |
 |
| iOS 6 |
This entire view scrolls, so just tap and drag to scroll and the table. Tap the button on the left, the circular arrow button to perform the calculation.
 |
| iOS 7 |
 |
| iOS 6 |
The buttons from left to right:
Calculate, detail level, and maximum yardage.
The detail level changes how many values are displayed in the table. You wouldn't want 1 yard increments out to 2000 yards. Change the detail selection and hit the calculate button to see how the results change.
 |
| iOS 7 |
 |
| iOS 6 |
Here are the results...
 |
| iOS 7 |
 |
| iOS 6 |
Scroll down a bit and you will see that when the bullet crosses zero the entry is in bold.
 |
| iOS 7 |
 |
| iOS 6 |
Conclusion
Thank
your for choosing Gun Log. It is one of the most feature rich
firearm apps available. I hope you enjoy the app and find it useful.
Learn how the app works at home, don't wait until you are at the range
to try it out. When you are at the range you should be focused on what
you and others are doing, not some app!
Above
I described some of the features of the app. I mostly wanted to show
how things are done. There has been a lot of effort to make sure the
"how" is consistent through out the app. Make sure you look around a
bit, tap the various buttons, and explore the full depths of the app's
functionality.
Remember,
after paying the bills, I use revenue from these apps to purchase my
firearms related materials. Therefore, I owe you my thanks.
Thank you.
Addendum One
Error Logs
If you sync your iOS device with iTunes on a Macintosh computer the crash reporter log files are copied to your computer.
To find the log files in the Finder click the "Go" menu and hold down the option key and select "Library".
Go to Library/Logs/CrashReporter/MobileDevice/
Go into the folder for your device and look for logs associated with Gun Log.
Email the crash logs and I can see if there is information that will help resolve any issues.
Addendum Two
Firing Sessions
The Gun Log Apps are designed to be range logs. When you go to the range think of that as a "Firing Session". Each different firearm you use, or each different ammunition, or different distance, those are "Firing Sets". You may have many firing sets in one firing session.
Let's walk through this.
Normally, you should have entered a firearm and some ammo before you go to the range and log a firing session. When you are out with a firearm you don't want to be distracted entering data that you could have done beforehand.
Here is an example with some firearms entered.

And here is some ammunition entered.

Firing sessions are found by touching the third tab from the left. I already have one entry so lets make another by tapping the "+" button at the top right.

When you make an new firing session by pressing the "+" button the app goes directly into the new firing session. I will set the location to the "Back Yard" and the type to "Practice". You don't have to enter anything, but if you don't enter data it will be more difficult to find things later. Tap the button "Go to Firing Sets".

To create a new "Firing Set" tap the "+" button at the top right.

Select a firearm, firearm configuration, and ammo by tapping the appropriate button.

Let's pretend we are shooting a Ruger 10/22 and are using CCI Mini Mags. This should be something most everyone is familiar with.
Just go through and enter any data that is meaningful to you.

When shooting a rifle I don't have a special "Firing Grip", so I leave it blank. When shooting hand guns I find it important to log the grip style.

Enter in how many rounds you fired. Don't forget that you can dismiss the keyboard by tapping the "dismiss keyboard" button at the top right.

If you are using version 7.1.0 or higher you can dismiss the keyboard by pressing the done button that is found at the top of every keyboard.

The group size is important to log if you want to track grouping. Here I enter 1.25. The units doesn't matter. I enter group sizes in inches, but you can enter them in miles or kilometers if you want! Just always do it the same for all of your firing sets.

I enter 25 for distance. I always log distance in yards. Again, it doesn't matter if you enter meters or feet, just always use the same unit of measure.

If you want to track accuracy then scroll down a little further and enter "Point of Impact" (POI) data. The POI location describes if you were shooting high, left, right, etc. It is entered using "clock" values. 12:00 would mean you were shooting straight up high. 3:00 would mean you were shooting to the right. In this case I was shooting low, so I enter 6:00.
POI distance is how far from the point of aim (POA). If you were shooting at the dead center of the target and you were two inches low then enter 2 for the POI distance.

Well that is enough information for this example. Tap the "Sets..." button at the top left to go back. Don't accidentally tap the "Cancel" button on the top right!

To make this interesting we need more than one set. Since I am going to shoot the same gun using the same ammo just tap the "Edit" button near the top on the left. This will cause the list of sessions to change and show two buttons, a "-" button (to delete the entry) and a "+" button to duplicate the entry. Tap the "+" button.

The duplicated entry will have many of the fields carried forward, but not all.

For this firing set I will enter 3 for the group size and keep the distance at 25. Let's say that we shot low at the 5:00 position and were again 2" from point of aim.

Go back to the "Sets..." and you see we have two entries. You can tell a lot from the table entry. The entries show we were shooting a Ruger 10/22 that is chambered in .22 Long Rifle. Also we were using the factory configuration (Fact..). We were shooting CCI ammo, .22 Long Rifle caliber, 40 grain weight, hallow points, at a distance of 25 yards, expending 10 rounds.


Now tap the "Reports" tab button at the bottom right of the app. Then tap "Firing Sets For Grouping by Firearm".

No pick which firearm you are interested in. In this case I pick the 10/22.

Here we can see a summary of our firing sets, sorted by distance and group size.

Go back to "Reports" and scroll down a bit to find the Ammunition Reports. Tap "Firing Sets for Grouping by Ammunition".

Pick the ammunition.

We we can see the firing sets where the ammunition was used sorted by distance and group size.

This ends the tutorial on Firing Sessions and Firing Sets. As you can see this app is not just a simple inventory app! Not covered is the ability to log failures and store a photograph of the target. If you log failures then you can run reports on failures as well.