Contact:

slinkworks@gmail.com

Monday, November 21, 2011

Brief Introduction to Gun Log

(Important Update)

Check out the NRA American Warrior,  edition Number 5.
 
Introduction

Gun Log is designed around two major roles. The first role is firearm usage. The second role is inventory information.

Fire arm usage tracking is the primary role of Gun Log. I developed Gun Log to track failures so that I could correctly diagnose firing problems. A failure could be firearm related,  ammunition related, magazine related, spring related, or any number of things. With tracking you can look for patterns. Maybe your .380 Auto doesn't like to feed jacketed hollow points. Maybe your 5.56 carbine doesn't run reliably with certain magazines. Information captured at the firing session can be reviewed later to look for commonalities and patterns.

Inventory information is a secondary role of Gun Log. This role came about purely through users like you requesting features. You can store images of weapons, weapon configurations, and accessories. Purchase information can be stored for weapons and accessories. If you want you can also log the serial number of weapons and accessories. Remember that data security is your responsibility. If you are worried about losing your iOS device with such information then don't enter the data. It is up to you to decide with what you are comfortable.

Security

Gun Log does not share the data stored in the application. It is not exported via emails or any type of reports. It is not uploaded to any server or tracked in anyway. This is intentional.  Gun information is valuable and private. There are requests to add features to allow the transmission of this data. I recognize it would be useful to have the data available to use on other systems. If there is enough requests I could make a new app, completely separate from Gun Log that would have the same features as Gun Log with additional data sharing features. As for Gun Log, there is no intention to add any type of data sharing to the application.

Gun Log (3.6) does support iTunes file sharing. This feature allows you to save the data to your computer via iTunes. It is not automatic. You have to do it. Through iTunes you can save the Gun Log's database for personal backups. The Gun Log database is called Shooting_Buddy and you will see it in iTunes.

WARNING: Do not modify the database outside of Gun Log or move the database to a different iOS device. Do not change the name of the database. Such actions are not tested and are not supported.

iTunes file sharing does not merge data or synchronize data in any manner.

What this Tutorial Covers

This tutorial will cover the basics needed for you to get out to the range and use Gun Log in conjunction with your shooting routine.

You should not try to learn how to use Gun Log at the range. At the range your focus should be upon safety. You should create a few entries in Gun Log at home where your mind can be on learning the Gun Log app and not worrying about muzzle safety. I recommend you follow each segment below and enter the data. You can always delete the entries when you are finished.

Previous tutorials may go into greater detail. Since the layout of the app has changed over the many releases of Gun Log the screen shots of previous tutorials may not be exactly the same. However, the flow and manner of Gun Log has not changed and you may be able to understand how to use the feature in the current version of Gun Log.

Before you go to the range you should enter the weapons you will be firing and enter the ammunition you will be using.

Entering a Weapon

From the main weapon view you can create new weapon entries and navigate to weapon details.

 Just top the "+" button in the upper right corner of the Weapons view.


The newly created weapon entry will appear in the list.

 Then tap the blue ">" button on the right side of the entry and it will navigate to the details view of the weapon. There you can enter your information.


Fields with buttons on their left have "pickers" so you don't have to type in common information. If the data you need is not in the picker you can always tap directly into the field and a key board will pop up.

The top most field is the weapon's make.

If you tap the "Make" field a key board will pop up. I am very slow at typing on that key board.

You do not have to type in the "Make". You can tap the "Make" button and a picker will appear.


Just flip the picker to the maker you want and then tap the done button on the bottom right or double tap the maker you want.


Once the maker is entered then you can enter the model if you want. There are too many make and model combinations, so this one you have to type.

 When you are finished entering the model information just tap the "Done" button on the bottom left of the key board.


Now I just tap the caliber button and choose from common calibers. The picker has the data divided into four areas. The first entries are simple caliber entries such as .17, .22, .223, etc. The middle or second set of entries have more detail such as .22 Short, .22 Magnum, .243 Winchester, etc. The third set of entries are your "mm" entries, 6.8mm, 9mm, etc. The last set of entries are shot gun entries. This app is designed firstly for pistol shooting, then rifle, and shot guns are covered but this is not really an app for storing shooting sessions for shot guns.


For this example choose the 9x19 mm Parabellum. You can  double tap the entry or tap the done button when finished.


 This is the basic information that I typically enter for a weapon.


Entering Ammunition

Entering ammunition information allows you to quickly select your ammo during a firing session. After all, the important thing is getting out and firing your gun and maybe your new hand load.

Gun Log stores hand load information as well as "off the shelf" ammunition information.

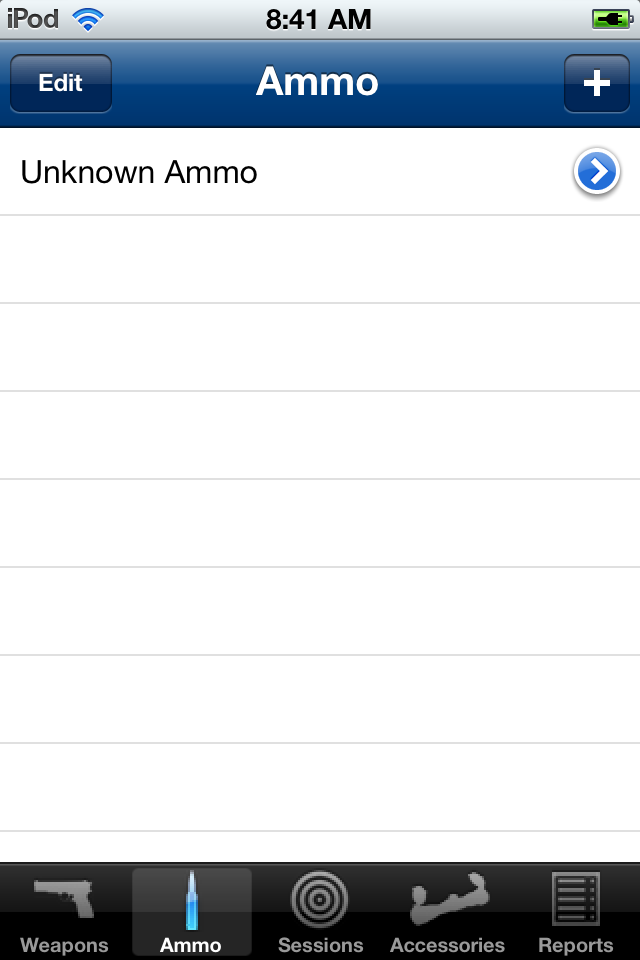
Make sure you are in the Ammo view by tapping the Ammo tab at the bottom of the app.

Tap the "+" button on the top right of the Ammo view.


A new ammunition entry will appear. Now tap the blue ">" button on the right and the app will navigate to the ammunition details view.


 In the ammunition details view you can enter the details about the ammo.

 For off the shelf ammunition you can type in the manufacturer or tap the "Make" button to select from a list of common ammunition makers.


Just flip the the list of makers and tap the "Done" button at the bottom right or double tap the entry to select the ammunition maker.


When you return to the ammunition details the maker you picked will show up in the view.


Tap the "Caliber" button and pick the 9x19 mm Parabellum.


The type of bullet can be typed in or picked as well. Just tap the "Type" button and pick a bullet type from the list.


These are the basic values I enter for ammunition. To use the drop table estimator more information would be needed such as the ballistic coefficient  and muzzle velocity.


Entering a Firing Session

To navigate to the firing sessions just tap the icon of the target at the bottom of the app.

Firing sessions are events where you are firing a weapon. There can be many firing sets during a firing session. You may go to the local range and fire three different weapons, or maybe the same weapon fired at different distances. You create a firing session so that you can enter firing set information.

To create a new "Firing Session" just tap the "+" button at the top right as shown below.


A new firing session will appear. Just tap the blue ">" button to go to the detail view of the firing session.


Tap the location field and enter a description of the location or event for the firing session. I enter "Local Range" for this tutorial.


Press the "Done" button to dismiss the keyboard. Tap the "Go to Firing Sets..." button.


A "Firing Set" is a weapon, a weapon configuration, an ammunition, and details about the target and the firing method.

You will typically have many firing sets during a firing session.

Entering a new firing set is more complicated that I would prefer. For now please follow these steps.

To enter a new firing set first tap the "Edit" button at the top right.


Once you have tapped the "Edit" button two things happen.

One, a green "+" button appears next to the entry titled "Tap Edit to show add button...".
This green "+" button is the add button.

Two, the "Edit" button changes to a "Done" button. Don't hit "Done" yet.


Tap the green "+" button and a new entry will appear. It will have a red "-" button next to it. If you tap the red "-" button it will delete the entry. If you delete the entry just tap the green "+" button to create a new entry.


Now tap the "Done" button in the upper right. This exits the editing mode.

Now tap the blue ">" button on the right of the new entry to navigate to the details of the set.


To choose a weapon just tap the "Weapon" button.


 In the "Weapon" picker just tap a weapon and select it.


Double tap the weapon or tap the "Done" button to dismiss the weapon picker.


Now select an ammunition by tapping the "Ammo" button.

Dismiss the "ammo" picker by double tapping an entry or tapping an entry once and then tap the "Done" button.


You may have noticed that buttons bring up pickers. Next tap the "Firing Method" button and pick a firing method.


Now tap the "Firing Stance" button and pick a firing stance.


If there is a firing method or firing stance that isn't in the picker just tap inside the text box and type in any thing you want.

Now tap in the "Rounds Fired" text box and enter the number of rounds fired.


To dismiss the keypad just tap the button at the top right of the app.


The entire view scrolls. Just flick the view and scroll to see more features of the firing set.


One very nice feature is the ability to associate a photo of your target with the firing set. Just tap the "Target Photo" button.


You can take a new photo or choose a photo from photos already stored on your iOS device.


In this case I had a photo already and I just tapped the second button from the left to bring up a photo picker and then I picked a photo.


Gun Log stores a low quality copy of the image. I recommend keeping the high quality image in the camera's album. If you want to remove the photo just tap the trash can. This will not remove the original photo from the camera's album.

One of the original reasons I wrote this app was to track failures. If you have a failure during a firing set just tap the "Failures" button.


To create a new failures entry first tap the "Edit" button at the top right to cause the table to show the add button.


Notice the "+" or add button appears on the left of the table entry titled "Tap Edit to show the add button...". Also notice the "Edit" button changed to a "Done" button.


Tap the green "+" or add button on the left and a new entry appears.


Tap the "Done" button on the top right to end the "edit" mode for the table. Now you can tap the blue ">" button to go to the details of the newly created failure information.


In the "Failure" details tap the "Failure" button to bring up a failure picker.


Find the failure you want and tap the "Done" button or double tap the entry to dismiss the picker.


Tap in the "Cause" text box and enter any pertinent information.


Tap the "Done" button on the bottom right of the keyboard to dismiss it.


Now tap in the "Notes" text box to enter additional information.


To dismiss they keyboard tap the dismiss keyboard in the upper right corner of the app.


The results of entering the failure information is shown below.


Entering an Accessory

Go to the accessory view by tapping the "scope" icon at the bottom of the app.


To create a new accessory just tap the "+" button on the top right.
Tap the blue ">" button on the right to go to the accessory details.
Here you can enter a description. Just tap inside the description text box.
Press the "Done" button on the bottom right to dismiss the keyboard.


To see all the information you can enter just flick the view and scroll to the items that are off the screen.

Tap in the "Notes" text box and enter additional information.


To dismiss the keyboard just tap the button at the top right of the app.


You can attach a photo of the accessory and enter purchase information if you want.


The reports area is where you can find information based on predefined criteria. For example I entered a failure earlier in the tutorial. Tap the "Failures by Weapon" entry in the "Weapons Reports".


It is the top item in the list of possible reports.


This will bring you to a list of all the weapons you have entered. Since there is only one entry tap on it.


Now a list of every failure for that weapon is displayed. Tap the failure entry.


Now the app goes directly to the failure entry. That is much easier than manually searching all of the firing sets inside all of the firing sessions trying to find when you used a particular weapon and then find if there was a failure logged.


Conclusion


In this brief introductory tutorial of Gun Log the details and steps of how to create weapon and ammunition information are shown.

Then the steps to show how to use the weapon and ammo information in actual firing sets are explained.

I recommend you enter your weapon and ammunition information before you go to the range.

The functionality of the accessory view is briefly described showing how to create an accessory record and add information to that record.

Finally one report is demonstrated to show the basics of how the report features work.

There are older detailed tutorials for previous versions. I recommend you browse through those while remembering that the user interface as changed over time but the basic concepts and methods of entering data have barely changed.

Now that you have entered this data you will probably want to delete it. Just tap the "Edit" button at the top left of the weapons view, ammo view, firing session view, and accessory view to show the delete button on the left of the table entries.

Thank you for buying Gun Log. Please do not forget to rate the app in the App Store on your iOS device or through iTunes.

Monday, October 31, 2011

Gun Log 3.5

Gun Log 3.5 is available for download or update!

I had to expedite this release because of the issue mentioned in the previous post with iOS 5 and picking an image from an existing album or camera roll.

Because of that issue I had to finish up the features I didn't plan to release for several weeks.

Notice the new Accessories tab!


Multi-Caliber configurations!


 Additional information is now available for Weapon Configurations. You can specify multiple caliber setups! You may have a .357 SIG and a .40 S&W setup for a pistol. Now you can track the usage of both. I think that is pretty dang sweet!


Quick selection for parts replacments!


 In Maintenance you can quickly specify if you re-tension the extractor on maybe a 1911 with an internal extractor, or specify some of the common parts replaced on regular intervals such as the recoil spring.


The NEW Accessories area!


Accessories can now be stored in Gun Log! This is a feature that I would have never done for my self but is in response from the many users of Gun Log. What started out as a log book for shooting results now includes a log book for property reference. For those that want to use the feature can store purchase information and other data about accessories such as optics, lights, lasers, or what ever you have.


Accessory details.


Sorry about the photo picker issues and I hope you enjoy the new features.

Saturday, October 29, 2011

Image Picker Bug

I was just testing some new features for Gun Log when I came upon a bug on iOS 5 on an iPhone or iPod Touch.

If you are picking an image from an existing camera roll or album the image picker will not dismiss.

I have it fixed and will update the app as soon as possible.

October 30, 2011 - I have uploaded a fix for approval. It should be available in a few days.
October 31, 2011 - The update is available and has been confirmed to fix the issue.

Wednesday, October 26, 2011

Gun Log 3.4

Gun Log 3.4 has been released.

Ammunition now has fields for round count and for bass usage count.

Round count is how many rounds are in the lot. This is useful to track how many rounds you have fired. The "Rounds Fired" Ammunition Report shows how many rounds are remaining once you enter in round count values for each ammunition.

The brass usage count is for reloaders/hand-loaders so that you can track how many times the brass has been used.

A new caliber was added to the list, the .300 Remington Ultra Magnum.

Also, there were significant database changes made in preparation for many features to come!

Please don't forget to rate the app and please contact us with feature requests.

Thank you for using Gun Log. I hope you find it feature rich and useful.

Monday, October 10, 2011

Gun Log 3.2

Gun Log 3.2

Gun Log allows you to track critical information and details of weapon and ammunition usage. This enables you to understand which ammunition runs best in a particular weapon. You can track failures by weapon configuration and ammunition. You can track group sizes and accuracy as well.

When I first started writing this app one of my pistols was not running properly. Tracking which ammunition failed wasn't enough. I also needed to know which magazine was used as well as the firing method and stance. Was it me limp wristing? Was it the magazine? Was it the ammo? I replaced the recoil spring, but when? How many rounds on that setup? All of these questions and more have to be considered when diagnosing problems. So I wrote this app to help me track failures. Pretty soon I was tracking all kinds of related data. Well, I then decided to put this on the App Store.

With version 3.2 of Gun Log the application has become a mature and feature rich application. I hope everyone that purchased a previous version has found these updates to be helpful and not disruptive. This brings me to another decision point on pricing. Since the feature set is ample and since I have put a lot more time into this than I ever imagined do I charge more? I don't know yet.

Well, on to the description of version 3.2 of Gun Log.

What's New?

New Ammunition Report shows rounds fired for each ammo type you have entered and used in a firing session.

More photos! You can now take a picture of your weapon and each weapon configuration. Photos stored in Gun Log are reduced in size and quality leaving the original image in the camera roll or photo album.

Choose photos from Photo Albums! If your iOS device doesn't have a camera just sync photos through iTunes and then you can pick from those!

Double tap gestures added to many of the "pickers" and views to make navigation simpler.

Various changes to views locating items that are more important or often used so that access and use is improved.

Security

Gun Log does not share the data stored in the application. It is not exported via emails or any type of reports. It is not uploaded to any server or tracked in anyway. This is intentional.  Gun information is valuable and private. There are requests to add features to allow the transmission of this data. I recognize it would be useful to have the data available to use on other systems. If there is enough requests I could make a new app, completely separate from Gun Log that would have the same features as Gun Log with additional data sharing features. As for Gun Log, there is no intention to add any type of data sharing to the application.

Tutorials

The previous tutorials go into great detail on how to use the features of Gun Log. Version 3.2 is slightly different but the changes are not a significant departure from the previous user interface layouts, methods, or functions, therefore this blog entry will show some of the changes but will not go into detail how each field or view is used.

Weapons

The Weapons view has been slightly modified to show the more commonly used functions nearest the top. Also you can now associate a photograph with each weapon.

 From the main weapon view you can create new weapon entries and navigate to weapon details.
 Notice that the buttons to access the weapon configurations, maintenance, and photo have been moved for quick access.

I hope the icons make sense. The configuration icon is showing three different types of optics. I choose this because one of the most common configuration changes is that of optics.

Notice that there is a "nick name" field for your weapon. Some users did not like the idea of specifying their weapon details in case the iOS device was lost or stolen. Instead of specifying the weapon make and model you can just give it a nick name and use that throughout the app.
 As you drag the view you can see all of the information you can store about your weapon.

Some users do not want to store their serial numbers. Other users want the serial number in case the weapon is lost or stolen and they need to report this information. You store whatever you feel comfortable with.
 Purchase information can also be stored. You might need this when you trade your weapon or if it is lost or stolen to report the cost of the weapon.


 Weapon Configurations

 A weapon can have multiple configurations. A configuration may be a setup with a different optic. A configuration may consist of a different barrel. A configuration can be multiple changes to the weapon. It is up to you. Since I can not anticipate what might change from one configuration to another it is up to you to describe the configuration.


 To add a configuration just tap the "Edit" button in the top right. Then tap the "+" button to the left of the "Tap Edit to show add button..." entry in the table. Finally press the "Done" button at the top right.
 The configuration has a brief description or title at the top. If the configuration has rounds fired before you started tracking usage with the Gun Log app you can enter the round count here.

You can take a photo of the weapon or use a photo from the photo album. Just tap the "Configuration Photo" button.
To calculate a bullet drop table which estimates bullet trajectory the sight height and zero distance are required. Since sight height depends on the configuration and zero distance depends on the optic those values are stored in the weapon configuration.


Firing Sets

The focus of Gun Log is to track weapon usage. Weapon usage is firing the weapon. Therefore the firing set is the central functionality of Gun Log.

A "Firing Session" is a period of using a weapon. Consider a firing session to be a "day at the range". While you are at the range you may fire several different weapons or ammunition types. Each change in weapon, weapon configuration, or ammunition constitutes a new firing set.

 "Sessions" or "Firing Sessions" is the entry point to the recording firing sets.
 A firing session is typically at a specific location or event.

Tap "Go to Firing Sets..." to create new entries for weapon and ammunition usage.
 A list or table of firing sets is kept with its firing session.
 A firing set stores detailed information for the weapon being fired, the configuration being used, and the ammunition being fired.
 Photos, failure information, and bullet drop information is commonly used and has been moved so that you can access this information quickly.
 Point of Aim (POA) and Point of Impact (POI) information is critical in understanding how well you are shooting and how well the weapon is operating.
 Wind direction is critical to POA and POI data.
 Numbers are one thing, but a picture is worth a thousand numbers or words. You can take a picture of your target and firing results.
If you touch and hold the controls at the top will fade away so you can see more of the picture.


Maintenance

Each weapon needs and deserves proper maintenance. For some people, their very lives depend on the proper functioning of their weapon.

 You track weapon maintenance through the weapon details view. Just tap the maintenance button and the app navigates to the maintenance log. You can add new maintenance entries as needed.
 Since there are so many variations of maintenance the main data is just text that you can enter in the notes area. You may have changed a barrel or recoil spring. Maybe you replaced some internal part.

For the common task of cleaning there are selectors so you can quickly specify how you cleaned the weapon.
 Also, you can signify if any parts were replaced as well. But the details of the replaced parts should be entered in the notes area.


Reports

There are many reports in Gun Log. This is the one area I anticipate changing over time. In Gun Log 3.2 there is a new report. In the "Ammunition Reports" section there is "Rounds Fired by Ammunition".

 Here is the "Reports" view. Just scroll the view a bit to see the new "Rounds Fired" report.
 Just tap the "Rounds Fired" entry to go to the report.


Each ammunition entered in Gun Log is listed and the name of the ammo is followed by "Fired #" where # is the number of rounds fired.


A Note about Images/Photos

Images and photos can take up a lot of space and memory. Gun Log stores a copy of the photo that is reduced in size and quality. The original remains in the camera roll or photo album.

Initially I had a thumbnail view of the weapon in the weapon view, as well as for the configuration, and firing set. I found this to use too much memory to be worth the thumbnail and so I took it out.

The image/photo view allows for zooming, scrolling, and hiding the controls.


Conclusion

Gun Log 3.2 has become a feature rich tool since its original release. I hope you find it useful for the price! Be safe.

Saturday, October 1, 2011

Gun Log 3.1

I have updated the "target view" for a firing session.

Now the controls are on top of the picture and they are transparent.


If you tap and hold, the controls will fade from view!


The target shows the results of my first time shooting of my father's .44 Magnum. First shot was to see how to hold and the next five shots are shown on the target! They were hot loads and things started to open up a bit. Target distance: 35 yards.

Remember, I wrote this app for me!