I just verified that version 2.2 is available and the update works and I did not lose any data during the process.
Since it was my first update I was a bit nervous. I would feel awful if the app didn't download and keep your data.
As I learn this process I do appreciate those that have purchased the application. It is a risk that every user takes and I do not consider it lightly.
Gun Log 2.2 updates the database. Now that I know that I can do that correctly my confidence increases that I can deliver features.
Gun Log 2.2 has a new "Rounds Fired" report and new data fields in weapon configuration and ammunition.
The new report and new fields follow the same pattern of data input and reports in Gun Log 2.1 so at this time I am not doing a tutorial for them.
Thank you again for your support and please rate the app. I just need a few more ratings for an average to show up in the App Store.
Gun Log iPhone App for logging gun information, range logs and range information, ammunition logs and information, including hand loads, accessory details, and weapon usage reports. Gun Log will never use iCloud or any functionality that shares the data, which was promised when the app was released. View Gun Log on the App Store.
Thursday, June 30, 2011
Tuesday, June 28, 2011
Gun Log 2.2 almost ready
Gun Log 2.2 is almost ready.
Thanks to lots of feed back I have made some important modifications to Gun Log.
The "bullet make" was not always saved. That has been fixed.
A new report has been added for "rounds fired". This report is very useful.
In preparation for version 2.3 some additional fields have been made available in the User Interface. There are several fields in the database that haven't been exposed yet because the feature hasn't been fully designed.
Added fields in the Weapons Configuration:
Thank you for your feedback and support.
Thanks to lots of feed back I have made some important modifications to Gun Log.
The "bullet make" was not always saved. That has been fixed.
A new report has been added for "rounds fired". This report is very useful.
In preparation for version 2.3 some additional fields have been made available in the User Interface. There are several fields in the database that haven't been exposed yet because the feature hasn't been fully designed.
Added fields in the Weapons Configuration:
- Sights
- Sight height
- Barrel twist rate
- Zero distance (the distance at which the configuration is zeroed)
- Ballistic Coefficient
- Muzzle Velocity
Thank you for your feedback and support.
Saturday, June 25, 2011
If you are concerned about data security...
If you are concerned about data security let me explain how Gun Log works. Warning, there will be some technical terms some of which may be used correctly. ;-)
The Gun Log 2.1 app does NOT:
If you are worried about your weapon information being viewed if the iPhone/iPod/iPad is lost or stolen then be wise about the data you enter into Gun Log or any app.
If you are worried about weapon serial numbers then don't enter them.
If you are worried about listing the makes and models just enter a nick name that you will remember and associate to the proper weapon. The nick name is a very handy feature of the Gun Log!
If you store information on any device that could be lost or stolen then you should secure the device with a password.
The Gun Log 2.1 app does NOT:
- Does not use the location manager.
- Does not us NSLog to capture information about weapons.
- Does not send any data from the iOS device in any way.
If you are worried about your weapon information being viewed if the iPhone/iPod/iPad is lost or stolen then be wise about the data you enter into Gun Log or any app.
If you are worried about weapon serial numbers then don't enter them.
If you are worried about listing the makes and models just enter a nick name that you will remember and associate to the proper weapon. The nick name is a very handy feature of the Gun Log!
If you store information on any device that could be lost or stolen then you should secure the device with a password.
Thursday, June 23, 2011
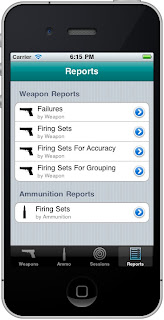
Reports Tutorial
Reports help you understand how a weapon or ammunition is performing. The report area will change the most in future releases so report related tutorials may be outdated. Check the blog for updated tutorials on reports.
In version 2.1 of Gun Log there are five reports. Four reports are weapon oriented and one report is ammunition oriented.
All weapon oriented reports start with a weapon's list where you select a weapon to see the report details.
Tap the "Failures" report.
A list of weapons is shown. Let's see how many failures "Lil' 380" has had. Tap the entry for "Lil' 380".
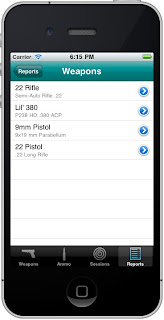
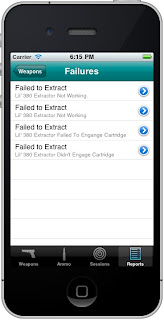
There are four entries for "Lil' 380". Very disappointing indeed. What is wrong with this weapon? The list of failures has the failure type and then some summary information. It looks like this weapon has a problem extracting. You can tap any entry to see the failure details.
Tap the "Weapons" button at the top left to return to the top level report view. You can always tap the "Reports" icon at the very bottom of the app in the "tab bar" to go back to the top level report view.

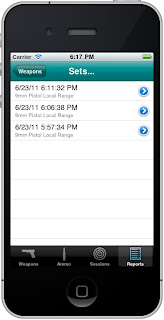
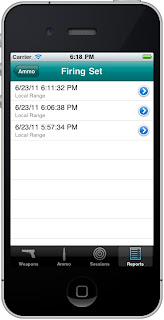
Tap the "Firing Sets" entry under "Weapon Reports".
Again a list of weapons is shown. Tap the entry for the 9mm pistol.

Listed are the firing sets in which the 9mm pistol was fired.
As usual, tap the button at the top left to navigate back.
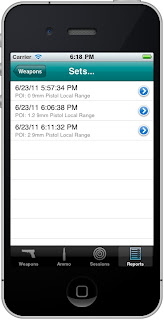
When you get back to the top level reports view tap the "Firing Sets for Accuracy".

Now tap the 9mm pistol.

The entries are sorted by Point of Impact information. POI: 0 indicates that you hit where you aimed.
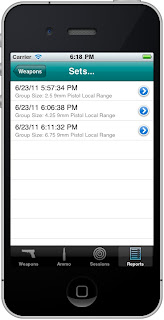
Navigate back to the top level reports view and tap "Firing Sets For Grouping".

Select the 9mm pistol again.
The firing sets for the 9mm pistol are sorted by group size.
Navigate back to the top level reports view. Top "Firing Sets by Ammunition".

A list of ammunition is displayed. Tap the 9x19 mm Parabellum entry and the app navigates to a list of firing sets in which that ammo was used.
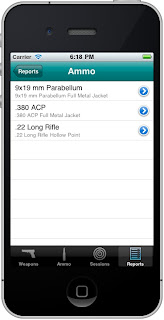
Here is a list of firing sets where the ammo selected was used.
The reports allow you to navigate in such a way you can discover failures by weapon, or when ammunition was used, or several other ways.
Reports will be the area that will change the most. If you have any requests for a specific report post it to the Gun Log Users Group.
In version 2.1 of Gun Log there are five reports. Four reports are weapon oriented and one report is ammunition oriented.
All weapon oriented reports start with a weapon's list where you select a weapon to see the report details.
Tap the "Failures" report.

A list of weapons is shown. Let's see how many failures "Lil' 380" has had. Tap the entry for "Lil' 380".

There are four entries for "Lil' 380". Very disappointing indeed. What is wrong with this weapon? The list of failures has the failure type and then some summary information. It looks like this weapon has a problem extracting. You can tap any entry to see the failure details.

Tap the "Weapons" button at the top left to return to the top level report view. You can always tap the "Reports" icon at the very bottom of the app in the "tab bar" to go back to the top level report view.

Tap the "Firing Sets" entry under "Weapon Reports".
Again a list of weapons is shown. Tap the entry for the 9mm pistol.

Listed are the firing sets in which the 9mm pistol was fired.
As usual, tap the button at the top left to navigate back.

When you get back to the top level reports view tap the "Firing Sets for Accuracy".

Now tap the 9mm pistol.

The entries are sorted by Point of Impact information. POI: 0 indicates that you hit where you aimed.

Navigate back to the top level reports view and tap "Firing Sets For Grouping".

Select the 9mm pistol again.
The firing sets for the 9mm pistol are sorted by group size.

Navigate back to the top level reports view. Top "Firing Sets by Ammunition".

A list of ammunition is displayed. Tap the 9x19 mm Parabellum entry and the app navigates to a list of firing sets in which that ammo was used.

Here is a list of firing sets where the ammo selected was used.

The reports allow you to navigate in such a way you can discover failures by weapon, or when ammunition was used, or several other ways.
Reports will be the area that will change the most. If you have any requests for a specific report post it to the Gun Log Users Group.
Wednesday, June 22, 2011
Entering a New Firing Session (part 4)
... Part 3
In this tutorial I will finish off the description of how to enter a firing set by covering the remaining data fields. Remember you don't have to fill out all of the fields.
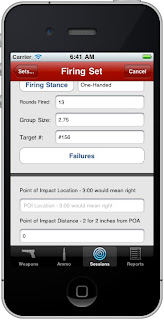
The next data is Point of Impact (POI) and Point of Aim (POA) data.
I went back and forth over how to enter POI type data. Should I make a picker that looks like a target and just touch to indicate impact locations? How do you put that type of information into a report in a format that is commonly known and easily understood?
As I talked with people I found that they would use a common way to describe POI.
"How did the gun shoot?", I asked.
"It shot high."
"To the right or left?"
"It shot high right, about 2 o'clock, about 3 inches out."
I realized that using the hour hand of a clock was commonly understood. That is how POI, POA, and wind direction is described in the app.
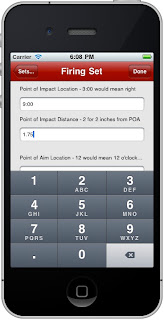
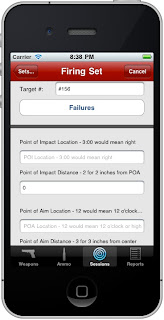
To enter "Point of Impact" data just tap the field.
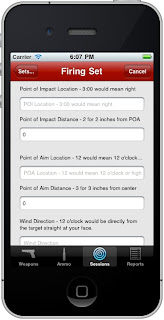
A picker comes up with 24 time entries. Remember, 3:00 would be to the right, 9:00 to the left, 12:00 straight up, and 6:00 straight down.
Tap the "Done" button when you have picked the value you want.
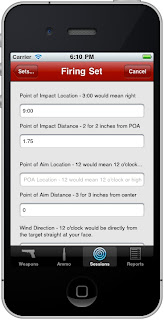
"Point of Impact Distance" is how far from the point of aim (which is usually the center of the target) the point of impact occurred. So, if the POI is straight up and two inches high you would enter 12:00 with a distance of 2.
In this example the gun was shooting to the left, so 9:00 was entered. I shot 1.75 inches wide to the right, so I enter 1.75.
Tap the "Done" button at the top right when you are finished entering the distance.
If you are shooting at the center of the target then the Point of Aim (POA) information can be left blank. If you where trying to shoot 1.75 inches to the left (9:00) then you could enter that information and the results is POI hits POA and therefore you were dead on.
If the "Point of Aim Distance" is zero then that always means the center of the target regardless of the value for "Point of Aim Location".
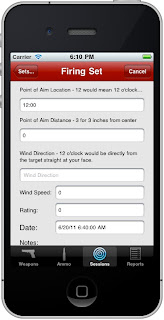
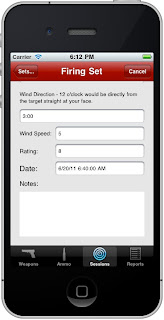
The "Wind Direction" is also specified using the "hour hand" notation. 12 o'clock would be the wind is blowing directly from the target into your face. This is much simpler than saying the wind was for the north west and I was facing due east.
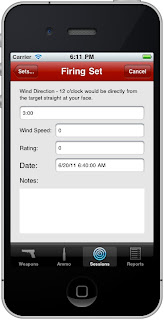
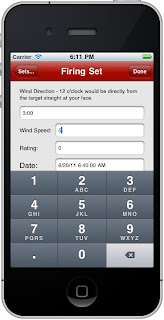
To enter "Wind Speed" just tap the field and enter the value through the keypad. Press the "Done" button at the top right of the app to dismiss the keypad.
Use any unit of measure you want and be consistent.
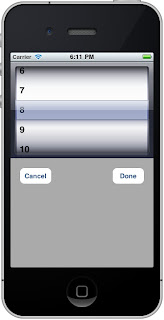
The "Rating" field is a subjective value where you can rate or rank the firing set. For me, 10 would mean that I thought it was an excellent firing set. You don't have to rate the firing set.
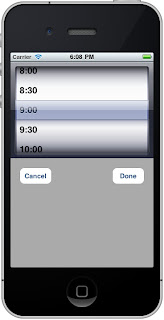
Tapping the rating field will bring up a picker with values 1-10.
The date field captures the date and time of the firing set. The time being the most interesting value because the firing session has the date as well.
Finally there is the notes field. Anything extra you want to note can be entered here.
When you are finished just tap the "Sets..." button at the top left of the app to return the the list of sets for a particular firing session.
At this point you can add a new set, or tap the "Session" button to go back.
Firing a weapon with a particular configuration using a particular ammunition is a firing set. You can record many useful pieces of information. If you only want to enter a failure you can do so. If you want to enter group size and point of impact information you can do that as well.
The manner in which point of impact, point of aim, and wind direction information is specified is consistent for all three values and uses "clock" or "hour hand" notation. This allows for a common way to describe the information and allows for the information to be used in reports in a clear and meaningful way.
I hope these tutorials help you to use or decide to use the Gun Log app for iPhone.
In this tutorial I will finish off the description of how to enter a firing set by covering the remaining data fields. Remember you don't have to fill out all of the fields.
The next data is Point of Impact (POI) and Point of Aim (POA) data.
I went back and forth over how to enter POI type data. Should I make a picker that looks like a target and just touch to indicate impact locations? How do you put that type of information into a report in a format that is commonly known and easily understood?
As I talked with people I found that they would use a common way to describe POI.
"How did the gun shoot?", I asked.
"It shot high."
"To the right or left?"
"It shot high right, about 2 o'clock, about 3 inches out."
I realized that using the hour hand of a clock was commonly understood. That is how POI, POA, and wind direction is described in the app.
To enter "Point of Impact" data just tap the field.

A picker comes up with 24 time entries. Remember, 3:00 would be to the right, 9:00 to the left, 12:00 straight up, and 6:00 straight down.
Tap the "Done" button when you have picked the value you want.

"Point of Impact Distance" is how far from the point of aim (which is usually the center of the target) the point of impact occurred. So, if the POI is straight up and two inches high you would enter 12:00 with a distance of 2.
In this example the gun was shooting to the left, so 9:00 was entered. I shot 1.75 inches wide to the right, so I enter 1.75.
Tap the "Done" button at the top right when you are finished entering the distance.

If you are shooting at the center of the target then the Point of Aim (POA) information can be left blank. If you where trying to shoot 1.75 inches to the left (9:00) then you could enter that information and the results is POI hits POA and therefore you were dead on.

If the "Point of Aim Distance" is zero then that always means the center of the target regardless of the value for "Point of Aim Location".

The "Wind Direction" is also specified using the "hour hand" notation. 12 o'clock would be the wind is blowing directly from the target into your face. This is much simpler than saying the wind was for the north west and I was facing due east.

To enter "Wind Speed" just tap the field and enter the value through the keypad. Press the "Done" button at the top right of the app to dismiss the keypad.
Use any unit of measure you want and be consistent.

The "Rating" field is a subjective value where you can rate or rank the firing set. For me, 10 would mean that I thought it was an excellent firing set. You don't have to rate the firing set.
Tapping the rating field will bring up a picker with values 1-10.

The date field captures the date and time of the firing set. The time being the most interesting value because the firing session has the date as well.
Finally there is the notes field. Anything extra you want to note can be entered here.

When you are finished just tap the "Sets..." button at the top left of the app to return the the list of sets for a particular firing session.
At this point you can add a new set, or tap the "Session" button to go back.

Firing a weapon with a particular configuration using a particular ammunition is a firing set. You can record many useful pieces of information. If you only want to enter a failure you can do so. If you want to enter group size and point of impact information you can do that as well.
The manner in which point of impact, point of aim, and wind direction information is specified is consistent for all three values and uses "clock" or "hour hand" notation. This allows for a common way to describe the information and allows for the information to be used in reports in a clear and meaningful way.
I hope these tutorials help you to use or decide to use the Gun Log app for iPhone.
Tuesday, June 21, 2011
Entering a New Firing Session (part 3) Failures
... Part Two
Continuing with the tutorial for firing sessions this web log entry covers the important area of "Failures".
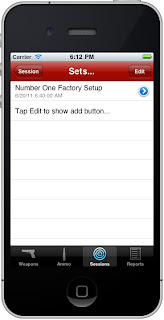
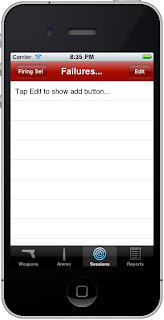
There may be more than one failure during a firing set therefore there is a button entitled "Failures" that takes you to the area where you can enter as many failures as needed for this firing set.
Just tap the "Failures" button.

To enter a new failure tap the "Edit" button at the top right.
Now tap the green "+" button on the left of the table entry.
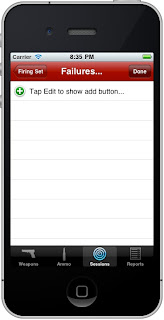
A new failure entry will appear. Just tap the "Done" button to exit the editing mode of the table view.

Now tap the blue ">" button on the right side of the new table entry.

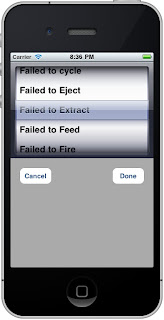
You are now in the Failure detail view. Here you can enter the failure type or pick a failure from a common list of failures. There is a field to store the cause and any additional notes concerning the failure.
Tap the "Failure" button on the left of the failure data field.

Select the failure and tap the "Done" button.
Now tap the cause field and enter the cause by using the popup keyboard.

Tap the "Done" button at the bottom right of the keyboard.
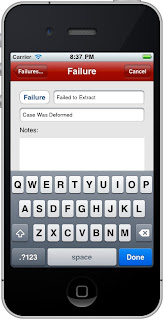
Now tap the notes field and enter any additional information you want. Tap the "Done" button at the top right of the app.
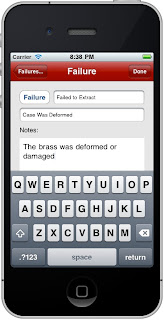
Here is a screen shot of the data I entered for this tutorial. Tap the "Failures.." button at the top left of the app to go back to the table that lists all of the failures entered for this firing set.
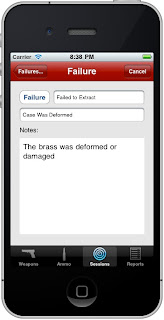
Notice the new failure is listed with summary details so that you can recognize the failure more readily.

Tap the "Firing Set" button at the top left of the app to return to the firing set.
Failure information is very handy. If you keep track of failures you can see which ammo, weapon, and weapon configuration had failures.
In the next tutorial I will cover point of aim, point of impact, and other important information.
Part 4...
Continuing with the tutorial for firing sessions this web log entry covers the important area of "Failures".
There may be more than one failure during a firing set therefore there is a button entitled "Failures" that takes you to the area where you can enter as many failures as needed for this firing set.
Just tap the "Failures" button.

To enter a new failure tap the "Edit" button at the top right.

Now tap the green "+" button on the left of the table entry.

A new failure entry will appear. Just tap the "Done" button to exit the editing mode of the table view.

Now tap the blue ">" button on the right side of the new table entry.

You are now in the Failure detail view. Here you can enter the failure type or pick a failure from a common list of failures. There is a field to store the cause and any additional notes concerning the failure.
Tap the "Failure" button on the left of the failure data field.

Select the failure and tap the "Done" button.

Now tap the cause field and enter the cause by using the popup keyboard.

Tap the "Done" button at the bottom right of the keyboard.

Now tap the notes field and enter any additional information you want. Tap the "Done" button at the top right of the app.

Here is a screen shot of the data I entered for this tutorial. Tap the "Failures.." button at the top left of the app to go back to the table that lists all of the failures entered for this firing set.

Notice the new failure is listed with summary details so that you can recognize the failure more readily.

Tap the "Firing Set" button at the top left of the app to return to the firing set.

Failure information is very handy. If you keep track of failures you can see which ammo, weapon, and weapon configuration had failures.
In the next tutorial I will cover point of aim, point of impact, and other important information.
Part 4...
Entering a New Firing Session (part 2)
... Part One
In the previous tutorial covered entering a new firing session and creating a firing set for that session. We entered weapon, weapon configuration, and ammunition information.
In this tutorial we continue entering firing set information where we left off.
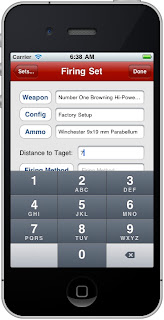
To enter "Distance to Target" just tap the field to the right of the label. A numeric keypad will popup. Use any unit of measure you want such as feet, yards, or meters. Just be consistent.

Dismiss the keypad by pressing the "Done" button at the top right.
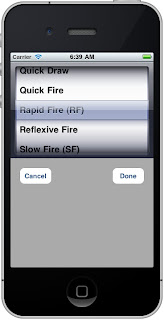
The "Firing Method" can be entered by hand through the popup keyboard. Just tap inside the data field. When you have finished entering the firing method be sure to press the "Done" button on the bottom right of the keyboard.
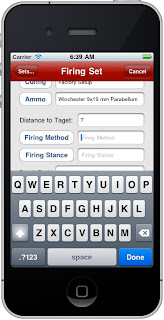
I prefer to pick a firing method instead of typing. Just tap the button "Firing Method" that is on the left of the data field. A firing method picker will appear. After making a selection, just press the done button.
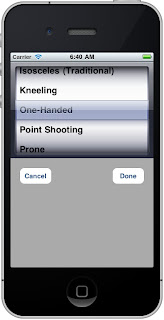
Similarly you can enter the "Firing Stance" information.
If you tap the button for "Firing Stance" a picker will appear. Again, just tap the done button when you have finished.
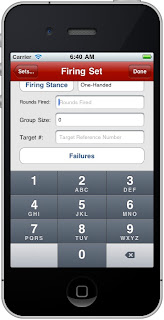
Tap the data field for "Rounds Fired". A numeric keypad will appear. If the keypad covers the data field such that you can not see it, just scroll the firing set view by flicking the view.
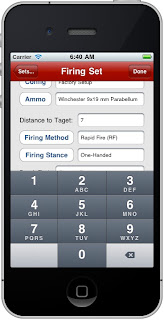
Now the data field is in view! When you are finished with the numeric keypad just tap the "Done" button on the top right of the app.
When entering the group size be sure to use a unit of measure consistent throughout the app. Again, dismiss the keypad by pressing the "Done" button on the top right of the app.
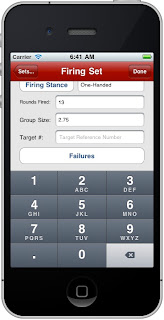
The "Target #" is not restricted to numbers alone, it can contain the pound sign (#), numbers, words, letters, what ever and how ever you track your targets. Just dismiss the keyboard by pressing the "Done" button on the bottom right.
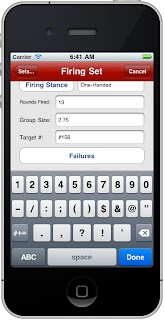
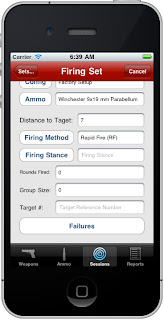
Here is a screen shot of what we have entered so far.
In this tutorial we continued entering "Firing Set" information. We entered data for the distance to the target, the firing method, the firing stance, the rounds fired, the group size, and the target number.
The next tutorial will continue were this one left off and cover the important topic of failures.
Part 3...
In the previous tutorial covered entering a new firing session and creating a firing set for that session. We entered weapon, weapon configuration, and ammunition information.
In this tutorial we continue entering firing set information where we left off.
To enter "Distance to Target" just tap the field to the right of the label. A numeric keypad will popup. Use any unit of measure you want such as feet, yards, or meters. Just be consistent.

Dismiss the keypad by pressing the "Done" button at the top right.

The "Firing Method" can be entered by hand through the popup keyboard. Just tap inside the data field. When you have finished entering the firing method be sure to press the "Done" button on the bottom right of the keyboard.

I prefer to pick a firing method instead of typing. Just tap the button "Firing Method" that is on the left of the data field. A firing method picker will appear. After making a selection, just press the done button.

Similarly you can enter the "Firing Stance" information.

If you tap the button for "Firing Stance" a picker will appear. Again, just tap the done button when you have finished.

Tap the data field for "Rounds Fired". A numeric keypad will appear. If the keypad covers the data field such that you can not see it, just scroll the firing set view by flicking the view.

Now the data field is in view! When you are finished with the numeric keypad just tap the "Done" button on the top right of the app.

When entering the group size be sure to use a unit of measure consistent throughout the app. Again, dismiss the keypad by pressing the "Done" button on the top right of the app.

The "Target #" is not restricted to numbers alone, it can contain the pound sign (#), numbers, words, letters, what ever and how ever you track your targets. Just dismiss the keyboard by pressing the "Done" button on the bottom right.

Here is a screen shot of what we have entered so far.

In this tutorial we continued entering "Firing Set" information. We entered data for the distance to the target, the firing method, the firing stance, the rounds fired, the group size, and the target number.
The next tutorial will continue were this one left off and cover the important topic of failures.
Part 3...
Monday, June 20, 2011
Entering a New Firing Session (part 1)
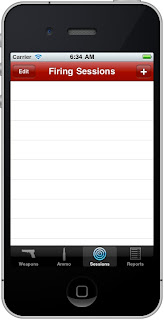
This tutorial covers "Firing Sessions". To navigate to the firing sessions just tap the icon of the target at the bottom of the app.
Firing sessions are events where you are firing a weapon. There can be many firing sets during a firing session. You may go to the local range and fire three different weapons, or maybe the same weapon fired at different distances. You create a firing session so that you can enter firing set information.
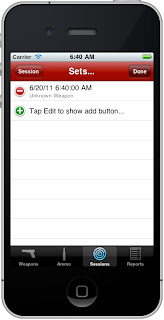
To create a new "Firing Session" just tap the "+" button at the top right as shown below.
A new firing session will appear. Just tap the blue ">" button to go to the detail view of the firing session.

Tap the location field and enter a description of the location or event for the firing session. I enter "Local Range" for this tutorial.
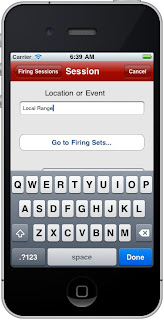
Press the "Done" button to dismiss the keyboard. Tap the "Go to Firing Sets..." button.
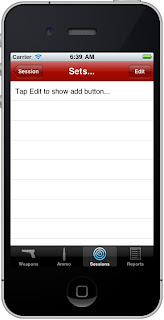
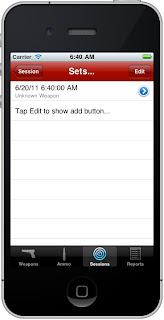
To enter a new firing set first tap the "Edit" button at the top right.
Then tap the green "+" button that has appeared on the left of the top entry.
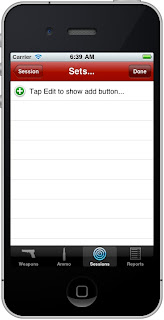
A new entry is created. Tap the "Done" button at the top right.
Now tap the blue ">" button on the right of the new entry to navigate to the details of the set.
To choose a weapon just tap the "Weapon" button.
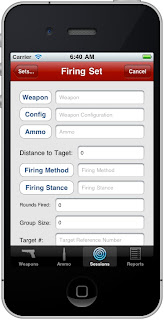
In the "Weapon" picker just tap a weapon and select it.

Then tap the "Done" button at the top left.

Tap the "Config" button to select a weapon configuration. You might have various setups for your weapons and you are firing a specific setup.
In this example I choose the default factory setup.

Tap the "Ammo" button to select the ammunition being used in this firing set.
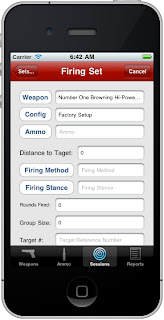
The "ammo picker" will appear. I will choose the Winchester ammo for my Browning Hi-Power.
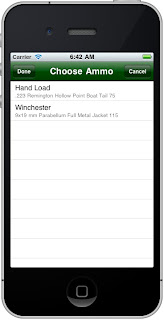
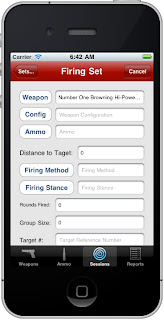
Here is the results so far and you didn't have to enter the details through a keyboard! I like that.
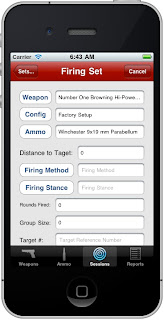
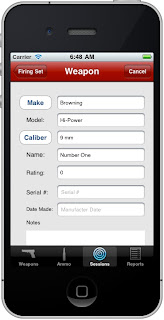
If you want to see details about the weapon, configuration, or ammunition you can tap the corresponding field next to the button. Here I tap the field that contains the description of my Browning Hi-Power. This navigates to the detail view of my pistol. Just tap the "Firing Set" button in the top left to return to the firing set.
This tutorial covered entering a new firing session and creating a firing set for that session. We entered weapon, weapon configuration, and ammunition information.
The next tutorial will cover more of the data stored in a firing set.
Part two...
Firing sessions are events where you are firing a weapon. There can be many firing sets during a firing session. You may go to the local range and fire three different weapons, or maybe the same weapon fired at different distances. You create a firing session so that you can enter firing set information.
To create a new "Firing Session" just tap the "+" button at the top right as shown below.

A new firing session will appear. Just tap the blue ">" button to go to the detail view of the firing session.

Tap the location field and enter a description of the location or event for the firing session. I enter "Local Range" for this tutorial.

Press the "Done" button to dismiss the keyboard. Tap the "Go to Firing Sets..." button.
To enter a new firing set first tap the "Edit" button at the top right.

Then tap the green "+" button that has appeared on the left of the top entry.

A new entry is created. Tap the "Done" button at the top right.

Now tap the blue ">" button on the right of the new entry to navigate to the details of the set.

To choose a weapon just tap the "Weapon" button.

In the "Weapon" picker just tap a weapon and select it.

Then tap the "Done" button at the top left.

Tap the "Config" button to select a weapon configuration. You might have various setups for your weapons and you are firing a specific setup.

In this example I choose the default factory setup.

Tap the "Ammo" button to select the ammunition being used in this firing set.

The "ammo picker" will appear. I will choose the Winchester ammo for my Browning Hi-Power.

Here is the results so far and you didn't have to enter the details through a keyboard! I like that.

If you want to see details about the weapon, configuration, or ammunition you can tap the corresponding field next to the button. Here I tap the field that contains the description of my Browning Hi-Power. This navigates to the detail view of my pistol. Just tap the "Firing Set" button in the top left to return to the firing set.

This tutorial covered entering a new firing session and creating a firing set for that session. We entered weapon, weapon configuration, and ammunition information.
The next tutorial will cover more of the data stored in a firing set.
Part two...
Subscribe to:
Posts (Atom)